Have you ever looked at a landscape coloring page and wondered: "How do I keep this block of green from being monotonous?"
Most of us usually focus on the main subjects, but forget that these seemingly humble bushes are the key factor in creating 3D depth and emotion for the entire work.
It might look small on the paper, but it holds the quiet rhythm of nature: an image of light passing through the leaves, a gentle breeze among the small blossoms.
In this bush coloring guide, we will explore four cozy styles that you can try on any bush coloring page or landscape coloring page: the Fresh Basic Bush, the Dreamy Flower Bush, the Warm Ornamental Grasses, and the Playful Hydrangea Bush.
Prepare your colored pencils, relax, and let's learn the secret to how to color scenery professionally.
The Basic Bush is not "basic" at all, as its name suggests. It is a symbol of nature's steadfastness and enduring vitality.
To successfully color a Basic Bush, you must understand the interplay of sunlight: where the leaves catch the brightest rays, and where leaves cover leaves to create deep shadow.
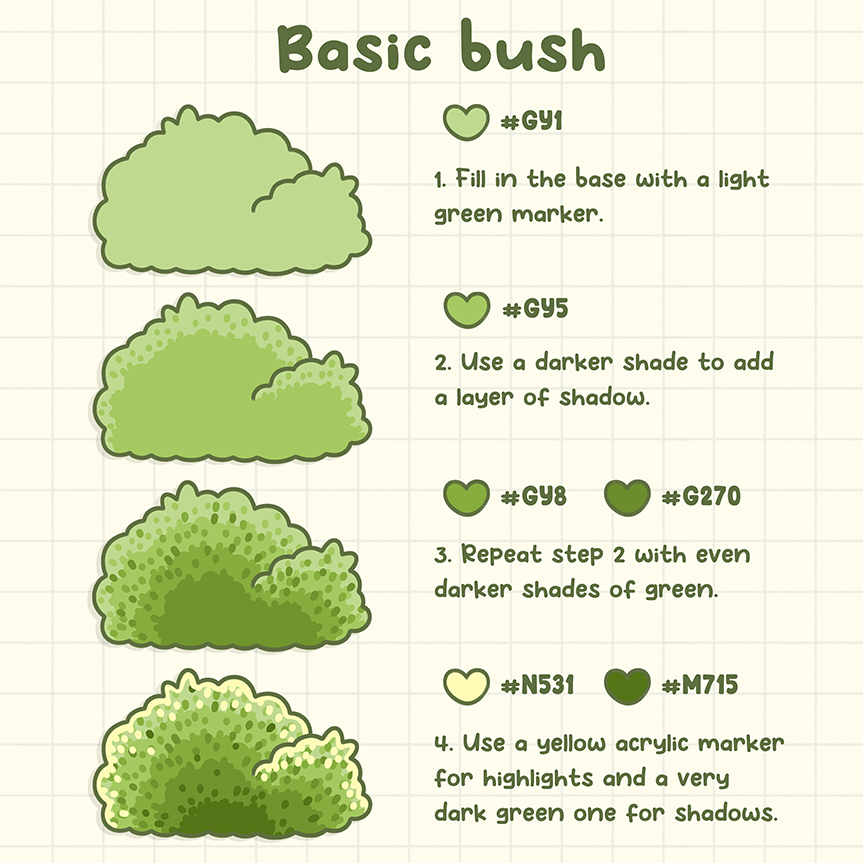
Step 1: Lay the foundation (GY1)
Imagine the sunlight just beginning to filter through the garden and identify the area of leaves directly hit by the sun; that will be the base layer.
Start with a light green tone. It must be the freshest green, representing the outermost "skin" of the leaf mass, and should be applied very lightly and evenly, covering the entire bush.
Step 2: Create a gentle shadow (GY5)
Add a slightly darker green beneath the folds or under the top curves. Draw strokes inward, keeping the outer edge brighter.
This subtle contrast suggests depth, as if the leaves are layered, helping the bush look round and fluffy.
Step 3: Darken the core of the bush (GY8, G270)
These two dark colors create the feeling of overlapping leaves, forming dark crevices that enhance contrast and simulate the density of a thick canopy.
Use the marker tip to make quick, decisive dots, like drawing small leaves, concentrating them heavily in the shadowed areas.
Step 4: Vivid Highlights (N531, M715)
The contrast between light and dark creates the soft, smooth texture that any cute bush coloring page needs.
So, dab a few tiny yellow light spots on the sunlit edge (only place them on the peak and outer border of the bush), then layer a dark green into the deepest gaps.
The Flower Bush is the embodiment of sweetness and romance. The dominant pink color brings a gentle feeling, but to keep the flower bush from looking flat, we need to create a delicate transition between shades.
The scattered small daisy like flowers will provide contrast and detail, making the flower bush more sparkling and vibrant than ever.
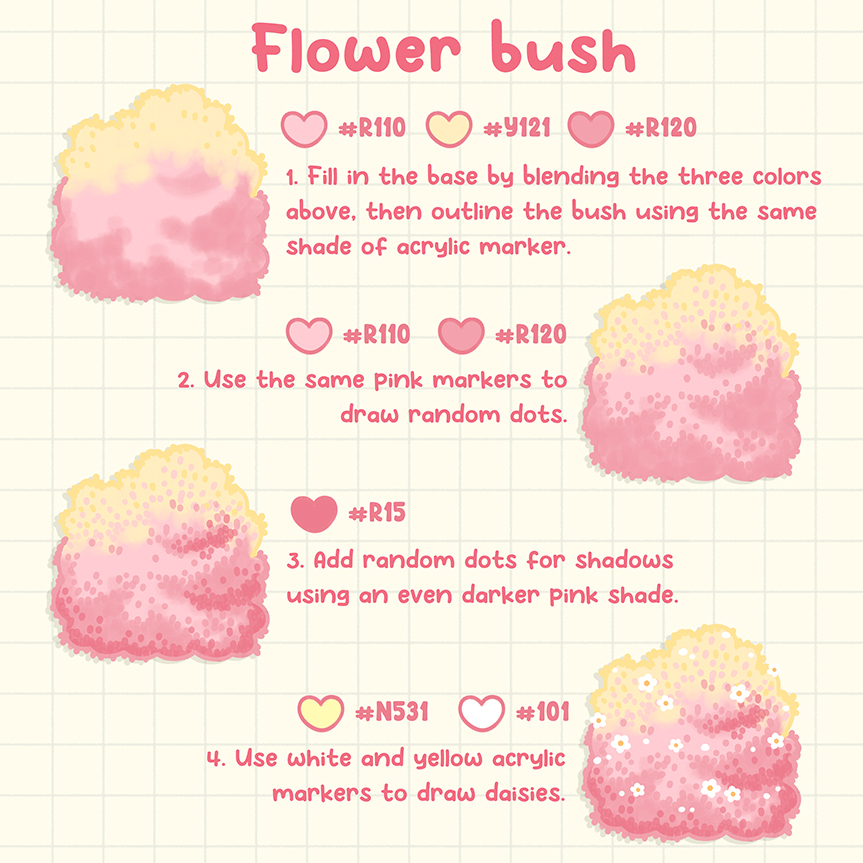
Step 1: Blend a soft base layer (R110, Y121, R120)
Blend 3 colors: pink and yellow, to create a soft, "cloud like" color base. Let the yellow concentrate at the top to simulate light. Then, use the same acrylic markers to draw a soft outline, shaping the bush without creating harsh borders.
You can apply the lighter color over the neutral tone to gently blur the edges.
Step 2: Scatter petal dots (R110, R120)
Use light pink markers to randomly dot around the bush, concentrating more dots near the top for brightness and allowing them to thin out towards the bottom to look like falling petals.
Step 3: Shade the flowers (R15)
Use a darker pink shade to add shadow dots where you want petals to be hidden behind others. Concentrate these dark dots on the lower and inner part of the flower bush.
This variation creates fullness, a quiet depth, a feeling as if you could touch it. This helps create depth, making some flower clusters seem obscured, enhancing the three dimensional feel.
Step 4: Daisy blossoms (N531, 101)
Use white and yellow markers to dot delicate, pristine white daisy like flowers. White dots for petals and yellow dots for centers, creating the final delicate detail, making the flower bush more radiant and romantic.
Ornamental Grasses bring a completely different nuance: warm, dry, and subtle. They symbolize the peace of an autumn meadow or the resilience of plants under the summer sun.
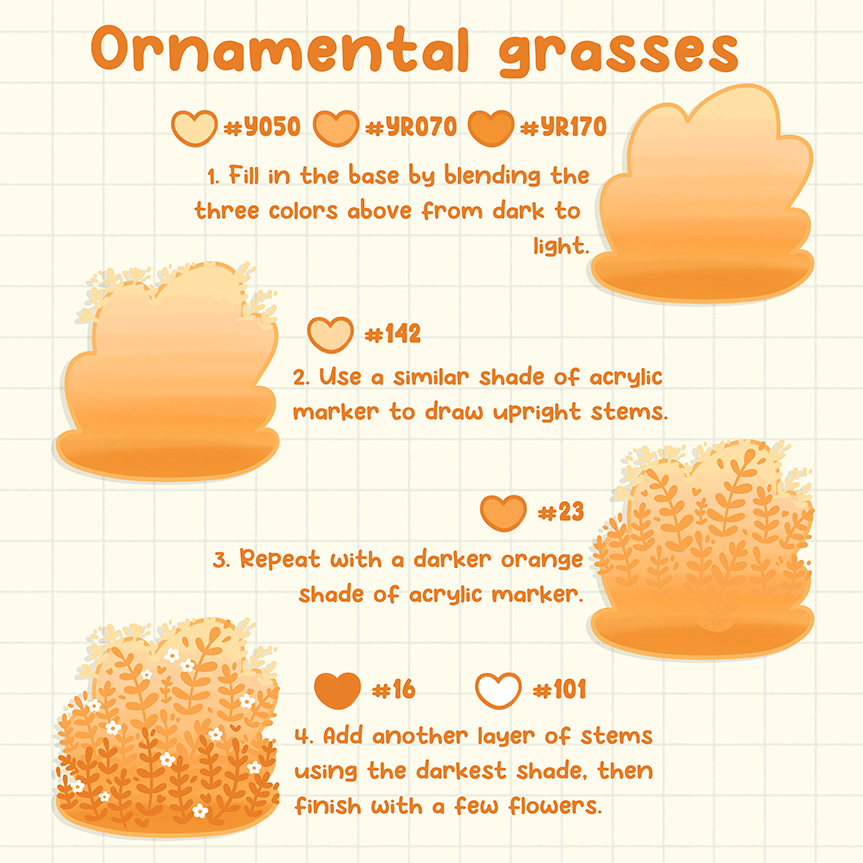
Step 1: Create a warm gradient effect (Y050, YR070, YR170)
Blend three colors from dark (at the bottom) to light (at the top) to simulate light shining from above. This gradient effect reflects sunlight passing through tall grasses, which is key to creating the feeling of "dry grass" in the sun.
Step 2: Base Grass Stems Layer (142)
Use an acrylic marker to draw fast, thin, vertical strokes. This is the most subtle grass stem layer, helping to define the plant's growth direction. Some stems should fade mid air to add more movement.
Step 3: Increase Darkness and Volume (23)
Repeat the stroke with a darker orange, concentrating it densely in the core and base of the bush to create volume and shadows for the grass clump.
Layer a few darker branches over the first ones. Occasionally, let two branches gently intersect.
Step 4: Accentuate depth and flowers (16, 101)
Use the darkest orange color to draw a final layer of grass stems, creating maximum contrast.
Then, use a white marker to dot tiny flowers. These white spots create a "sparkling" effect in the sunlight, highlighting the vibrancy of the grass clump.
Hydrangea bushes, with their large, round, multi colored clusters, are a symbol of sincerity and dreamy beauty.
Coloring Hydrangeas is an exciting challenge of harmony, where you must skillfully combine contrasting color blocks like blue and pink on a green background. The important thing is not just to recreate the colors, but to turn your painting into a vibrant and lively scene.
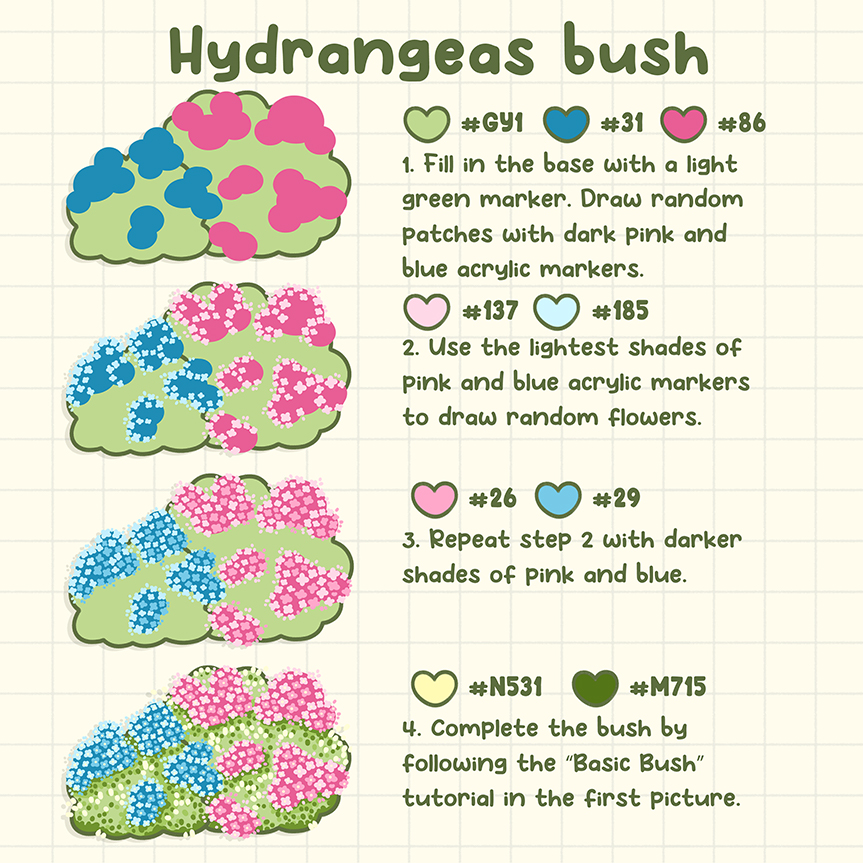
Step 1: Shape the Flower Clusters (GY1, 31, 86)
Color the leaf background. This is the color "skeleton," helping you locate the subsequent flower layers.
Color the main bush with light green, then use darker colors to randomly sketch the position of the flower masses with soft blue and pink patches; these are your flower clusters.
Step 2: Highlight the lightest flowers (137, 185)
Dot small green gaps between the dots to create volume for the flower cluster.
And add the lightest colors to each patch to simulate petals catching the sun. This layer needs to be wide, giving the feeling of blurred and soft flowers in the light.
Dot sparsely on the outer edge and denser in the center of the cluster.
Step 3: Increase Flower Cluster Depth (26, 29)
To add depth and thickness to the flower clusters, use a darker color to create shadows, making the cluster appear to protrude.
And concentrate the darker dots on the bottom and between the flower clusters, where they are obscured. This creates strong contrast, making the Hydrangea flowers "bloom" on the paper.
Step 4: Finish by creating leaf contrast (N531, M715)
Apply the technique from the Basic Bush: dot a few shimmering yellow spots and deep green shadows, which will help your hydrangeas blend into the harmony of the garden.
Don't let the flowers and leaves separate. Apply highlights and shadows techniques to the leaves below, helping the overall piece become cohesive and natural.
These four bush coloring techniques are the master key, helping you elevate your landscape coloring skills to a new level.
But to practice and fully feel the relaxation, you need a worthy foundation. Southern Lotus is the perfect place for you to practice how to color scenery and share your wonderful cute bush coloring page creations.
Don't let your imagination be limited; let the colors guide you!
Enter your email to get our special. Gift straight to your inbox.