

In the cozy world of coloring, trees are the soul, the place where sunlight lingers and creates gentle shadows. Learning to draw trees with different textures and colors is not only a relaxing exercise but also helps you add depth and emotion to any scene.
Coloring trees brings a sense of serenity. Whether standing proudly in a cozy garden or gently swaying next to a small house, trees carry the gentle rhythm of nature. Each tree has its own unique qualities, bringing the warmth of sunlight, the cool whisper of the shade, or the delicate bloom of spring.
Today, Southern Lotus will guide you on how to draw trees: Classic Trees, Pine Trees, Wisteria Trees, and Weeping Cherries, helping your coloring page become more vibrant and rich.
Take a deep breath, get your markers ready, and start creating your own little forest.
Classic Trees, with their full, round canopies, evoke the feeling of a soft, golden afternoon suspended in time. This is the perfect choice for autumn landscape paintings, standing majestically in a dry field or next to a cozy farmhouse. It brings a feeling of stability and a golden autumn day.
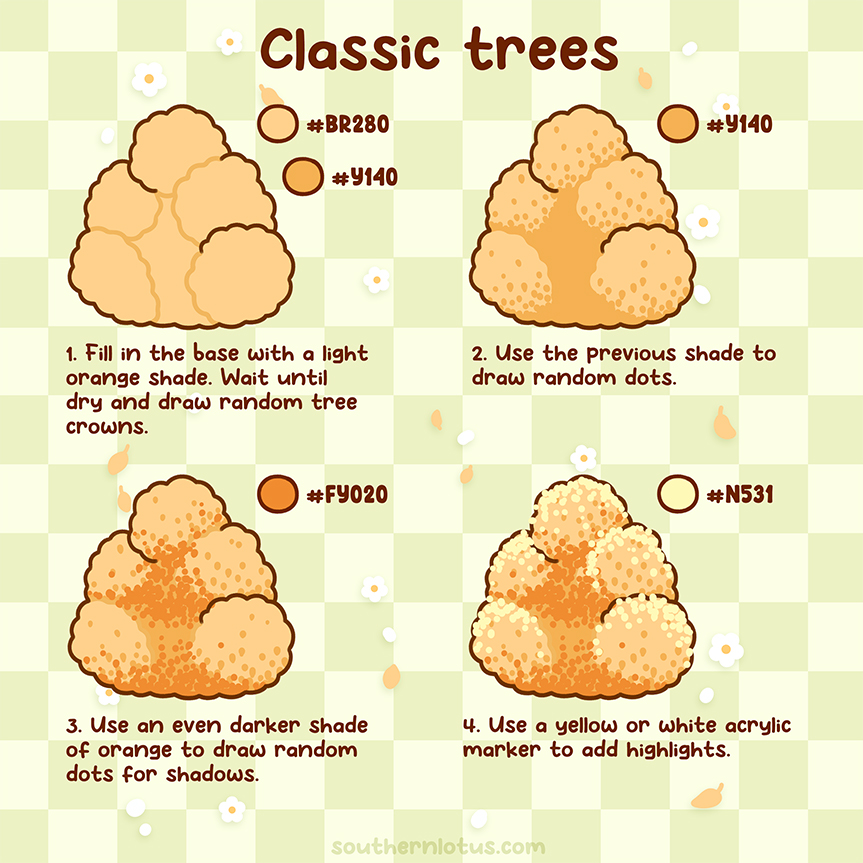
Step 1: The Sunny Base Layer (Colors: BR280 & YI40)
Fill in the entire canopy with a light orange shade. Once dry, gently sketch the round crowns to give the tree shape and volume.
Step 2: Create the Initial Texture (Color: YI40)
Next, use the same shade to add scattered small dots within the foliage. These uneven dots simulate leaf clusters and bring a lively feel to the tree. This starts to create a spongy texture and thickness for the canopy.
Step 3: Add Deep Shadows (Color: FY020)
Use an even darker shade of orange to continue drawing random dots. Concentrate these dots in the lower parts or shadowed areas to create depth and shadow.
Step 4: The Perfect Highlights (Color: N531)
Use a yellow or white acrylic marker to add highlights. Place these highlights on the upper edge or areas facing the light to create a sparkling and fluffy effect.
This type of tree is ideal for romantic, peaceful scenes, such as beside a lake, along a stream, or as a focal point in an old-fashioned garden. The drooping blossoms create a sense of movement and softness, transforming the painting into a dreamy corner of the world.
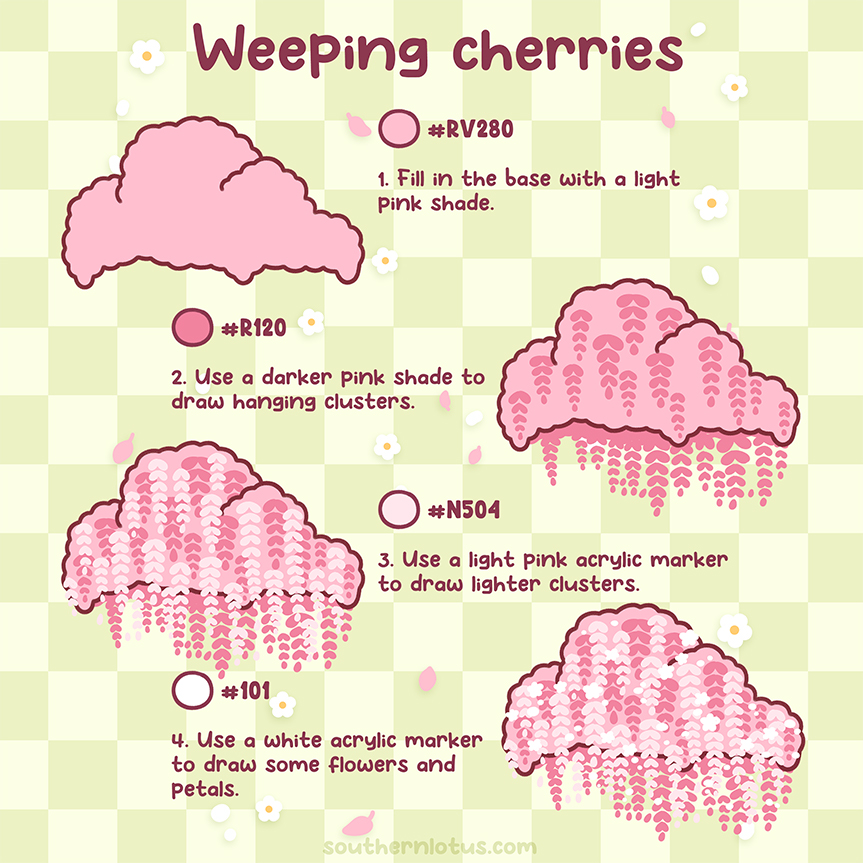
Step 1: Gentle Pink Base (Color: RV280)
Fill in the base of the entire canopy with a light pink shade, establishing the shape of the foliage.
Step 2: Draw Darker Flower Clusters (Color: R120)
Use a darker pink shade to draw hanging clusters. Draw broken, repeated strokes to give the impression of clusters hanging gently.
Step 3: Lighter Flower Layer (Color: N504)
Use a light pink acrylic marker to draw lighter clusters, interspersing them with the darker pink layer. This creates depth and richness in the floral tiers.
Step 4: Dotted White Flowers (Color: 101)
Use a white acrylic marker to draw some small flowers and petals. These details will make your cherry tree more vibrant and sparkling.
Wisteria Trees combine lush green foliage with soft purple drooping flowers, bringing an elegant and ethereal beauty. It is suitable for secret garden paintings, arched pathways, or hanging over an old stone wall. The combination of dark green and cascading purple clusters creates a magical, alluring, and vibrant space.
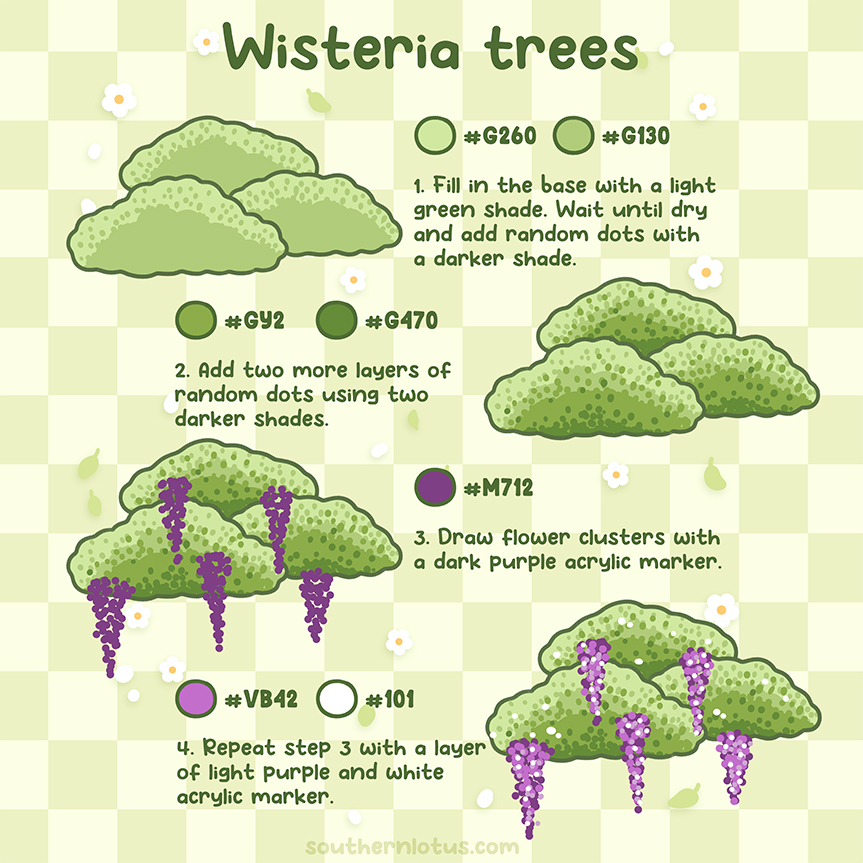
Step 1: Base Layer and Green Texture (Colors: G260 & G130)
Start by coating the canopy with a light green tone. Wait until dry and then use a darker green shade to add random dots to begin creating texture.
Step 2: Increase Foliage Thickness (Colors: GY2 & G470)
Add two more layers of random dots using two darker shades. This simulates the layering of leaves, creating natural thickness and shadows for the canopy.
Step 3: Dark Purple Flower Clusters (Color: M712)
Once the leaves are full and natural, it's time to add the flowers. Use a dark purple acrylic marker to draw clusters of flowers hanging gracefully from the branches. Vary their length and position for a natural look.
Step 4: Depth and Light for Flowers (Colors: VB42 & 101)
Next, use a lighter purple tone and gently blend it onto some flower clusters, finishing with small white highlights to represent petals catching the light. This creates light and shadow for the flower clusters, making them more vibrant.
The snow-covered Pine Tree is the centerpiece of any winter scene, Christmas setting, or a small village on a mountain. Its presence brings a sense of warmth, tranquility, and serves as an excellent focal point for a starry night sky or a romantic snowy landscape.
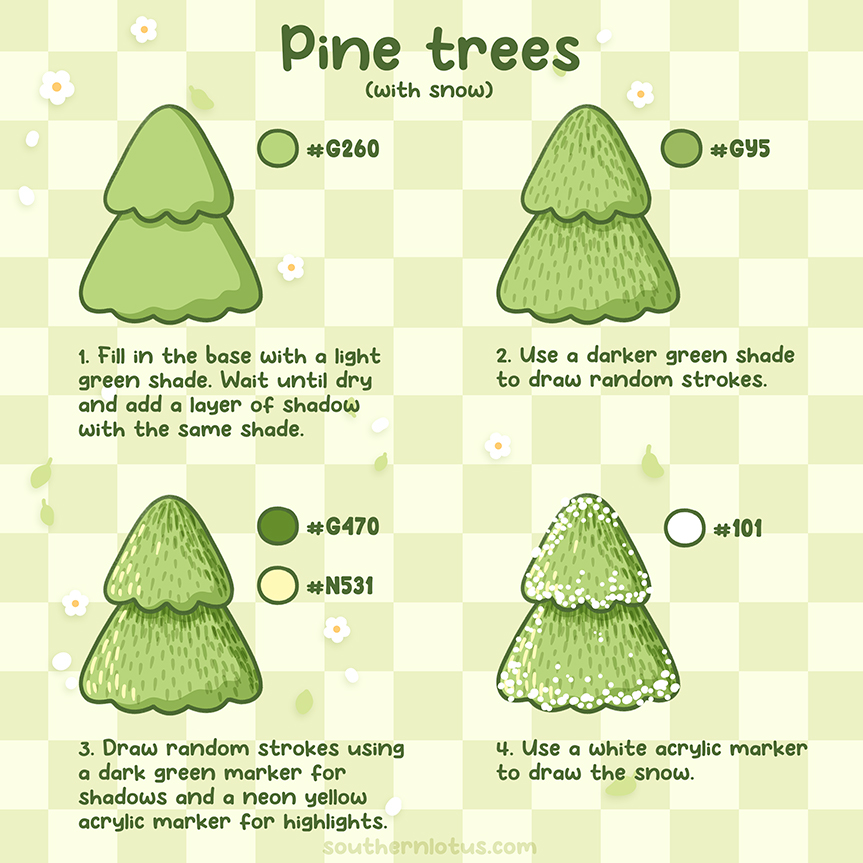
Step 1: Green Base and Shadow (Color: G260)
Fill in the base of the pine tree with a light green shade. Wait until dry, then add a light layer of shadow with the same shade in the areas that need emphasis.
Step 2: Create Needle Texture (Color: GY5)
Then, use a darker green to draw short, quick strokes following the natural curve of the pine needles. These strokes give the impression of layered branches.
Step 3: Depth and Highlights (Colors: G470 & N531)
Use a dark green marker to draw random strokes for shadows. Then, use a neon yellow acrylic marker to add small highlights on the needle strokes.
Step 4: Soft Snow Layer (Color: 101)
Finally, use a white acrylic marker to draw the snow. Dot or draw small strokes, focusing on the upper tiers of foliage and the edges to create the feeling of freshly fallen snow clinging to the tree.
Each tree tells its own story.
Classic trees shine with a golden warmth. Pine trees whisper of silent winter. Wisteria trees bloom with gentle elegance. And weeping cherries flutter softly like spring memories.
These four tree coloring techniques are the master key, helping you elevate your landscape coloring skills to a new level.
But to practice and fully feel the relaxation, you need a worthy foundation. That’s why we’ve prepared free coloring pages of these exact tree types for you to download and start coloring right now!
Don't let your imagination be limited, let the colors guide you!
Enter your email to get our special. Gift straight to your inbox.